Posts

Mother's Day Moggies

Image
Happy Mother’s Day!  My cards this week are the ones I made for my Mum and Mum-in-law using the Colorado Craft Company For Mom stamp set, another one by Anita Jeram. Firstly, I stamped the main image and coloured it with my Faber Castell Polychromos pencils.  I tried to add some variety of shade but didn’t bother to blend the colours. My plan was to blend the pencil colour using Zest-it Pencil Blend and some paper stumps.  It’s my first time using this and it worked well.  It’s an oily texture and I poured some onto a sponge I’d put in a small jar so I could dab the stumps onto the sponge.  This was a tip I got from a Sandy Allnock video.  For the background, I repeat stamped one of the smaller stamps from the set with Versamark and heat set with clear embossing powder.  I also added this stamp to the envelope and liner of the card. To finish the card, the panel and sentiment were mounted on a stitched panel before being adhered to the background and ...
Sending Love

Image
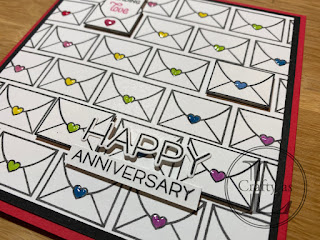
  Following a tidy up of my craft room, I realised that I have so many stamp sets and dies that I bought ages ago that have been either rarely, or never, used so I’m making an effort to give them some love.  This week’s post features a first outing for the Lawn Fawn Love Letters stamp set. To create a background of envelopes, I had in mind that I’d do it with my stamp positioner.  However, on starting using that, it was clear that it was going to be a complete faff so I just stamped them free hand instead.  I used MFT Hybrid ink as it’s Copic-friendly. I coloured the hearts in a rainbow pattern with my Copic markers.  For some accent pieces, I stamped and fussy cut some envelopes and a sentiment from Lawn Fawn Happy Happy Happy. The sentiment was mounted onto two of the envelopes and popped up on foam tape. To finish, the other two accent envelopes were adhered using foam squares and an enamel heart embellishment added to the open env...

Cardstock Strips

Image
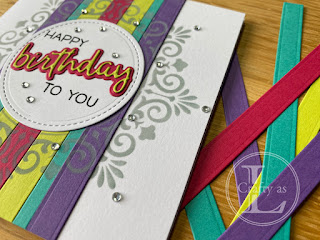
  This week’s card is one I made after watching the fabulous Jennifer McGuire on YouTube.  Her card looked so elegant so I wanted to have a go.  On reflection, I think I could have done with a larger stencil that covered more of the card. To begin, I cut a bunch of strips of various widths from 4 colours of card.  This is a great way to use up some of those off-cuts! Next, I glued the strips onto some scrap paper and trimmed the panel to the height of the card blank.  With Distress Oxide Weathered Wood, I used a blending brush to stencil the Frame pattern (Sweet Poppy Stencils) centrally onto the panel and card blank. The birthday and shadow dies are by Honey Bee Stamps and were cut from the same-coloured card as the strips and mounted onto a stitched circle die cut. I finished the sentiment panel with some stamping. Due to the stencil not being quite big enough, I thought the card needed a bit more interest so added rhinesto...

Draw A Blank

Image
  Do you ever feel intimidated by the blank sheet in front of you?  Apparently, it’s quite a common to sit down with a white sheet of card in front of you and for your mind to go blank. I purchased a gel press plate to make backgrounds in the hope that they would provide some inspiration that would spark an idea. These cards were for ladies in the Lavinia Birthdays group so they feature Lavinia Stamps.  I began with these two panels to create two cards.  I wanted them each to have a moon and I hadn’t left space in the printing so had to create one. For the purple panel, I brushed on white pigment ink through a circular stencil, adding a little silver and some white gel pen. Using a landscape stencil, I added some distant hills and near ground and also blended some ink to darken the sky and make the moon more prominent. After seeing a lovely card with a bokeh sky, I thought I’d give it a go using a few different colours.  I don’t think it wor...

Trendy Trees

Image
  My mission to make a few Christmas cards each month continues this week with 6 cards created with some new goodies from Taylored Expressions.  This time it’s using the Trendy Trees suite comprising a background stamp, die-cut and layering stencils. I started by stamping the Trendy Tree Farm Background stamp with Versamark and heat embossed using various metallic powders on white card and white on craft card. The first card was completed by using the cutting plate to create little tree ‘windows’ for the embossed trees to peek through.  The sentiment is from Waffle Flower Cozy Holiday Sentiments and the small tree and snowflake stamps, also from that set, were stamped in the same colour as the card to give some tone-on-tone pattern without detracting from the trees. Gold embossed trees with a Bermuda Bay frame on top  For the rest of the panels, I added colour to the trees using 3 of the 4 tree stencils (the 4 th stencil is the tree trunks). To b...

Skip Into The Sunset

Image
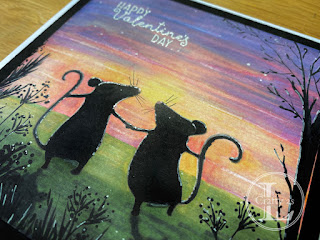
  This week’s post is the card I made for Mr L for Valentine’s Day.  I was inspired to have a go at making a scene with Copic markers after watching (many) Sandy Alnock’s videos.  Sandy is so talented and makes everything look so doable! To begin, I stamped the mice from Colorado Craft Company’s Ever Thine, another of the Anita Jeram stamps.  I used Ink on 3’s no-line ink, although the finished work ended up darker than I’d intended so I could have used black. For the first stage of the background, I used a variety of pinks, purples, blues, oranges and yellows and swiped lines in from each side of the panel. I started shading the mice, using darker and darker and darker shades, probably going too dark at the end as the features were more or less obliterated.  I tried to add shadows cast by the sun, linking the shadow to one foot only to give the impression of movement, making it look like they are skipping. Using the black Copic mark...

"Oops!" Moment

Image
  Do you ever have an 'oops!' moment, usually when you’re 99% through creating your card?  The decision then is whether to plough on and try to recover it or bin it and start again.  I will generally try the former, usually by stamping over the offending area however it wasn’t possible on this card so I had to think of something else.  Glitter came to the rescue! The aim was for a clean and simple slimline card in landscape format, with a cat on a rainbow platform. To begin, I masked off the bottom section and blended a variety of inks to make the rainbow section.  I spritzed with a little water to give some texture. Using my Stamparatus stamp positioner, as I wanted the cat silhouette to be super solid, I stamped the image 4 times.   The cat stamp is Mimsy by Lavinia Stamps.   After the sentiment was stamped, I felt it needed something extra so added a couple of small star clusters. Versafine Clair ink is slow drying and I’d inadvertentl...